Friday, 20 May 2011

Strathmore Journal Workshop 3 - Building Your Visual Journal from the Page Up.


The latest Strathmore Journal workshop suggests starting with a painted background...

This page is page 2 of my Strathmore journal so I wanted it to fit in with the page 3 I had already done for Workshop 1 so I needed to keep to a blue/green/pink pallette.

I used acrylic washes and scrubbed some paint away and then dried the page with a heat gun.

Next I used the suggested spatter technique to get some extra detail; I managed to spatter quite a lot of my work surface but I like the effect (on the page that is)..
Then I tried out some more techniques from Roz Stendahl's workshop.

I liked the idea of tearing masking tape in half and then putting it together again right sides in to get a ragged edge - I did the diagonal stripes bottom left and all the page edges this way. I could not find the recommended artists' masking tape, so just had to use ordinary tape and be sure to move it off the page fast!

I needed to add some yellow to tie the page together with page 3 so I used yellow for the page edges.

I used stencils to make the rectangles on the page, dabbbing into the stencil with stamp pads. Then I used the water colour crayons from Workshop 2 to give each frame a yellow border.

Image transfers have given my Journal a name - DISCOVERY JOURNAL - and the left hand rectangles have my journalled intentions, which are to use this journal to try out lots of different techniques.It now fits in with the ideas on page 1 (previous post) and also with the Inspirations and Discover text on page 3.

I also added an apt quote from Marcel Proust, in the bottom rectangle and then image transferred photocopies of  my romantic ladies I drew for my printing course.  This refers back to  reusing work  I have already done in my journals (Workshop 1).

Although the techniques are completely different I think Page 2 goes well together with Page 3 so I have finally filled in the blanks! And I think pages 1, 2 and 3 now have a theme as well as using lots of new techniques I have been learning from the Workshops.

Wednesday, 18 May 2011

Rescuing an Art Journal Page


A RETURN TO

Workshop 1 Recycled Journal Pages * 


I tried the Strathmore Workshop 1 - using recycled journal pages - and I was very unhappy with my first attempt.

The colours were dark and depressing so I abandoned the page and continued on into the journal.

However, this page was the first page in the journal and it had been bothering me every time I opened the book - there was gloomy, miserable page 1, and then overleaf (actually page 3) there was a brighter page talking about inspiration.

And I was far too mean to cut the page out!


At the same time, I wanted to work on a journal prompt from my lovely art journalling group on www.atcsforall.com.

It was a quote:

"Oh, the places you will go!" from Dr.Seuss.


And suddenly I was inspired! What a great phrase to start my journal with, especially as this is the one I am using to try all the new techniques I have been learning from The Strathmore Workshops and from the journalling group.

So I used acrylic washes to lighten and brighten the page and used some black fine liner pen to emphasise some of the eyes and faces.

Then I used the black pen in a stencil to write the Seuss quote and filled it in with a white pen. I added some vintagey photos with an emphasis on eyes and looking, outlined the eyes with my black pen, then softened the effect with some thin acrylic.

Then I added a great quote I found on the internet about the future and what kind of place it is - which fits in with the Dr. Seuss quote really well - and I now have not only rescued a really horrible page, but I have an inspiring opening page for my whole journal.

Next I am using the ideas from latest Strathmore Workshop 3 to create an interesting background for a journal page 2 which I am hoping  will complement the existing page 3....


Sunday, 8 May 2011

More Dry Point printing and Chine-collé

On Friday  I went to practice dry point and chine-collé  at the Unique Farm Cottage Studios near my home in Lincolnshire UK.

Because the studios have a printing press there all the time they are going to do monthly untutored sessions for £10 a session and the idea is that all the materials - papers  and inks etc -  will be there and the people who are attending help one another.

Luckily there was one attendee in particular who was very experienced, which was just as well as it is amazing how much I had forgottten - another reason for keeping the information correctly in my brain by writing it down in  this blog!

I also prepared plates in advance this time.

    For a total of £20.66 I went to Great Art  and I bought 2 packets of 10 Rhenalon Boards, 0.5mm, 11 x 15 cm  (approx 4" x 6" )  and 4 etching needles.

The Rhenalon Boards are like the clear acetate sheets I used at the tutored  workshop but they are a little thicker. I find I prefer them because there is less likelihood of cross hatching so vigorously that I go through the sheet and have to repair it with masking tape - like I did with my butterfly lady in the previous blog. She spent the day looking like a pirate with an eye patch!

The etching needles are one fine tip, one  bold tip, one oblique oval and one four sided oblique. I cannot claim to have exhausted all the opportunites with these! But I traced some of my mermaids on to the Rhenalon Boards and tried a variety of shading. 

The inks this time were oil based, a bit messier and harder to use, but there is a great advantage in that the prints can be over painted with water based paints. I used wet wipes to clean me and the plates as soap and water did not do much - also I was told that you can use cooking oil to clean up with...

I made a couple of prints with mermaidy green ink - and I shall have a go at adding extra water colour washes to these.
 
Then I had another try at Chine-collé.

I prepared the plate as usual, this time with black ink.


I had a mixture of green tones of paper and some old books to cut up for text. I also had green tissue paper and some gold paper off an Easter egg (which we had to eat of course - yum!)

Then I used a variety of papers and text right side down with prit-stick glue on the reverse (facing upwards)  -

There has to be a method of placing the glued papers down onto the plate without sticking myself to them with the glue!
I found the thin turquoise tissue paper was by far the worst!

The prepared plate goes on to the printing press. Newsprint is laid down first, then the plate - facing upwards - is added, then dampened printing paper is laid over the print, with more newsprint on top.

This goes through the press and, because of the glue, the collage papers become part of the print and the ink shows through the collaged papers.

The final print uses red ink and I left lots of ink on the plate so there was a lot of colour from the ink

Then I used tissue paper for "waves" - unfortunately some of these lifted during printing leaving lighter areas.

Luckily I really liked the final effect! When I got home I used a layer of matt acrylic medium to make sure all the "waves" were securely fixed to the print.


I love this technique and will try more next time  - probably planning the papers to add beforehand -  although I do enjoy the happy accidents!


Saturday, 30 April 2011

Dry Point printing using acetate sheets

I have just done a course on dry point and chine-collé  run by Claire Morris Wright of Leicester Print Workshop at the Unique Farm Cottage Studios near my home in Lincolnshire UK.

Dry point is a technique known as intaglio where the image was drawn on an acetate sheet using a sharp pointed tool.

You can add texture with dots, cross hatching etc.

I put an acetate sheet over a sketch I did of a romantic lady surrounded by butterflies.

Water based printing ink was spread onto a glass plate and evened with a roller and this was applied to the acetate. The ink needs to be scrubbed into the lines and the excess removed with scrim or a soft rag.


The acetate went face down  in the printing press between newsprint on top of well dampened paper  and the image - reversed - was then printed.

I used the same technique for the leaf prints which I intended to scan to use as digital backgrounds. The second  image  has had an extra coating of ink rolled on after the plate had been  prepared for printing.

Chine-collé

Chine-collé is a wonderful technique for adding colour and texture to a dry point print. We added light weight papers, fabric, and text to the prepared acetate plate. These additional pieces were laid right side down and then the backs of the added papers were covered in glue (using just an ordinary glue stick).

On the printing press the plate was laid on top of newsprint and the dampened paper for the final print was placed on top of it. More newsprint was laid on and the print went through the press.

The collaged papers become part of the print with the printed lines on the plate showing through the collage paper.


This is a really interesting technique and I am going to a Practice your Printing workshop on May 6th with some ready prepared acetate sheets to try out some more ideas!

Monday, 18 April 2011

Using Fold Out Journals - a Night and Day Panorama

In the Strathmore Journal Workshop 2 Linda Blinn showed how to add fold out pages to your journal, so now I decided to use the spread I made to make  panorama page. I had added a full page to the right hand side of the journal and a three quarters page to the left.


Then I used acrylic paints to colour the spread from dark to light


I used an atcsforall.com  journal prompt on "Night and Day". I wanted to use bats for night symbols and butterflies for day. So I drew some bats, chose the one I liked then traced it and scanned it. I lifted it off the background using the magic wand in Photoshop and made a page of bats


I chose some quotes on night, day, butterflies and bats from an internet search:

"The butterfly counts not months but moments, and has time enough. "
Rabindranath Tagore
"Bats drink on the wing, like swallows, by sipping the surface, as they play over pools and streams" Gilbert White
 “You can become blind by seeing each day as a similar one. Each day is a different one, each day brings a miracle of its own. It's just a matter of paying attention to this miracle.”
 Paulo Coelho quotes (Mystical author, one of Brazil's most successful novelist)
“Night brings our troubles to the light, rather than banishes them.”  Seneca quotes (Roman philosopher, mid-1st century AD)
“May we be fearless... from friends and enemies...from known and unknown ... from night and day...May all the directions be our allies.” Atharva Veda quotes
“A dreamer is one who can only find his way by moonlight, and his punishment is that he sees the dawn before the rest of the world.” Oscar Wilde 


Almost done!
I used some alphabets from Dover clip art to label the pages "NIGHT AND DAY" and "DAY AND NIGHT"

I used collaged quotes on the dark pages and tinted them so they were not so stark and white


On the light pages I used the image transfer technique for the quotations so the colour shows through the text.


FINAL SPREAD

I used a waterproof sepia pen and added some personal journalling on thoughts and feelings about the night and the day, and then added a few more butterflies to fill in any places where the page looked empty.

Monday, 11 April 2011

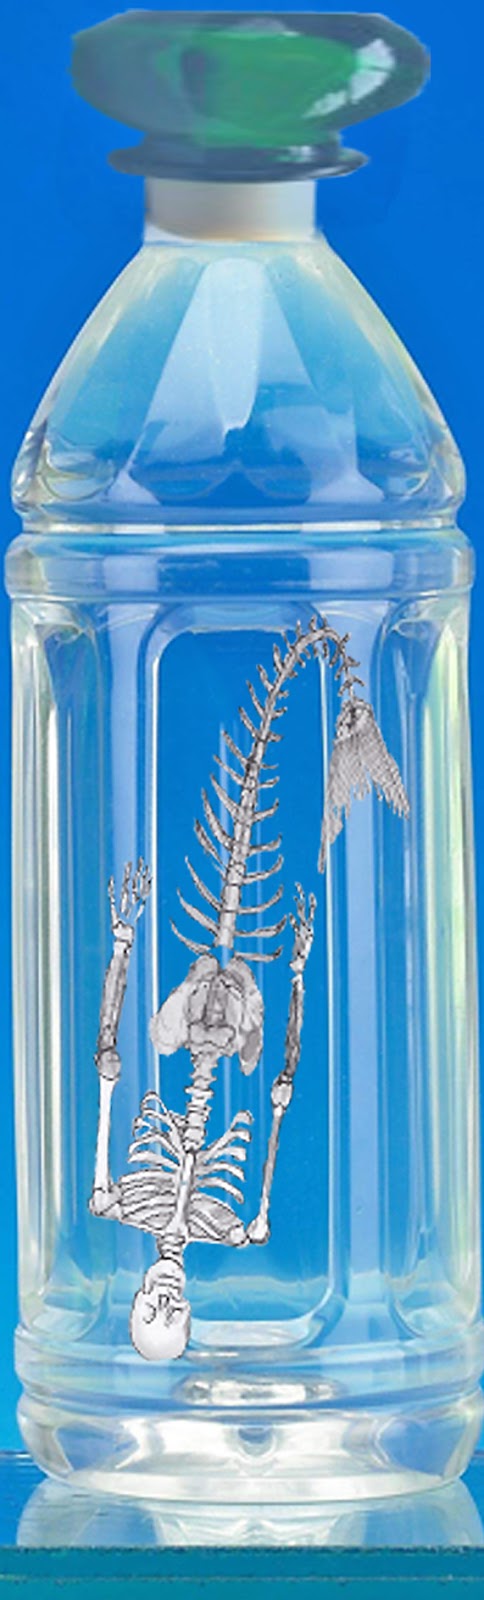
Digital mixed media recipe - how to bottle a mermaid

Ingredients
1 picture of clear bottles
1 picture of a bottle stopper
2 mermaid pictures
1 picture of a human skeleton
1 picture of fish skeleton
Photoshop or similar image editing programme


Method
This is a good way to practice the reusing old journal pages as in the instructions for  the Strathmore Workshop 1. I wanted to make a display of "preserved mermaids" for a chunky book pages swap I am doing called Cabinet of Curiosities; the idea is that these belonged to an old collector of oddities.

I found some old mermaid pictures I had drawn and scanned and opened them in Photoshop.

Using the lassoo tool  and a graphics tablet I drew round the mermaids, and cut them out.

I mermaid had open eyes so I used the lassoo and the clone stamp tool to remove most of the eyes so they appeared closed.

I used the fish and human skeletons to help me to draw a mermaid skeleton, and also lifted that from the background using the magic wand tool.

I lassoed the bottle stopper


Then I dragged and resized the images so they were "in" the bottles. 


I flipped one of the skeletons, made it smaller and put it upside down in one bottle for variety.


I used the vibrance tool to make the mermaids look pale and pickled!


Changing the opacity puts the skeleton "deeper" into the bottle - I did not use this option as the final pages are only 4" by 4" and I though the detail would not show up enough on such a small scale


Wednesday, 30 March 2011

Strathmore Workshop 2 - Start Where You Are. Instructor Linda Blinn

The second free workshop of the great series from Strathmore* was more about ideas and techniques than in making a single journal page like Workshop 1; there were lots of useful  ideas but I particularly liked these:-


1. Making pockets to keep bits and pieces while the journal is evolving is a useful tip:-
"Cut a diagonal line from the top left corner to the right edge of the page—approximately 6 inches up from the bottom right corner (for 9" x 12" size journal).Use double sided adhesive tape or glue to secure the bottom of the pocket. Use brads or tape on the right edge to hold the pages together."
I put this inside the back of the journal.


I  have been using acrylic washes up until now for journalling,  but the instructor likes water soluble crayons, paints and pencils so I have had a change.

She suggests making grids by rubbing over things -  these were plastic pockets for storing slides etc
and I used water soluble pencils.

For these I used various stencils and used a mixture of water soluble crayons and mister bottles.

The pages are now ready for journalling on...


 Another really good idea which - doh - had never occurred to me is to add an extra piece to a journal to give a bigger interactive spread


I am doing a kind of family history journal and  I had left stuff out....


so I added another fold out page on the left


Of course if you have foresight you could add extra pages to the journal for a panoramic spread as you go - see right

To add the extra page, just score a fold and glue it to the edge of the page and the page is ready to use. I had to disguise the overlap where I added the extra to the journal I was already working on....

*The workshops are completely free and are still open and you can work at your own pace - the next one starts on May 1st and you can still join the first two workshops. See http://www.strathmoreartiststudio.com
" Once a workshop begins, you can join in at any time and complete workshops at your own pace. Once a workshop begins, it will stay active until August 1, 2011."